What do you get if you put together an Android starter kit, several empty cans, some broken household items, two geekdads and a four year old?
A kick-ass maker weekend in Berlin!
dianthos welcomed me with “I got these tin cans and this one servo motor, let’s build a robot!”. Obviously the response was “Excellent! Let’s go shopping”.
Planning
Friday evening was the planning stage. Mostly to decide what the robot wil look like and what we can actually do with the available materials.
The original idea came to dianthos while looking at tin can toys so we spend a bit choosing the cans and figuring out if and how the Arduino UNO would fit in there.
While there was no shortage of tin cans and odd bits and pieces, our electronics stockpile was a bit limited:
- One 180 degree servo motor
- A couple of buttons
- One potentiometer
We had enough LEDs and resistors and there were a few other bits and pieces in the starter kit but what we really were interested in was the servo motor.
At the end the plan called for a robot that swivels it’s torso and has LEDs for eyes.
Shopping
Saturday was off to geekdad paradise: Conrad and Bauhaus. For those not familiar with german brands Conrad is an electronics shop and Bauhaus is a DIY shop.
 And to make things difficult, our goal was to NOT buy a brand new Dremel drill just so we can drill a couple of holes in a tin can. We came very close to not achieving the goal.
Total cost of the materials was about 10€ but our bill run quite a bit higher (useful advice to all wives out there: don’t let your man go to a DIY and an electronics shop with his best mate. Some cliches are too strong for even the best of us).
Our materials at hand it was time for coding. This was actually the easiest task. Fritzing and Arduino put together make hobby electronics a breeze.
Our robot uses the servo to swivel it’s torso 180 degrees, has a red LED for it’s cyclopean eye and the USB light for hands. We took the three Arduino examples Blink, Button and Servo.Knob.
To make it more interesting we decided that the robot would have two modes of operating. In one the light remains on and the robot can be swiveled using the potentiometer, in the other the robot swivels automatically and the led blinks. Switching between modes is controlled through a button that toggles between the two modes.
The code for all of this for all of this is just a bit of organisation around code of the three examples and it fits in a gist. The circuitry is similarly the aggregation of the corresponding examples in Fritzing:

Sunday
So with the circuitry and the software decided we proceeded in assembling the robot. Which took us almost the whole day!
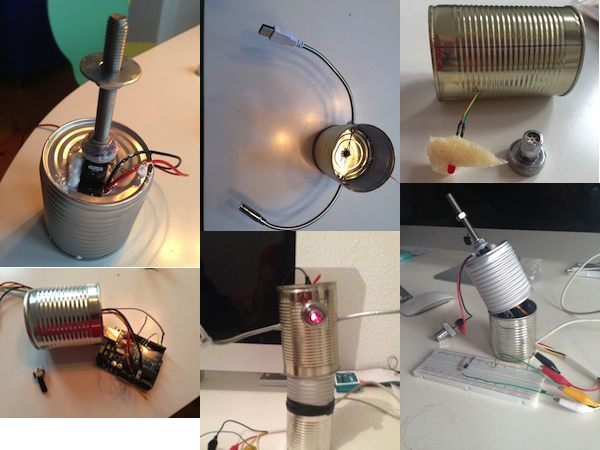
the sinister red eye was entirely intended :) It is the 50th Doctor Who anniversary, so the obligatory “Exterminate” was the soundtrack during the robot’s operation.
ATCAR is up for a revision, it should get a control board for the potentiometer and the button (at the moment there’s just cables leading to the breadboard) and a future version 2.0 will probably incorporate a battery power supply.
Arduino is so much fun! And trust me, the best way to get the kids involved is to get the geekdads excited!